Navigating airport security can often be the most stressful part of flying. With rules constantly changing, it’s easy to feel unprepared. This guide offers expert tips for digital nomads to transform you into an airport security pro, ensuring a swift and stress-free journey.
Stay tuned for the insider scoop!
Key Takeaways
- Check your flight and terminal information before leaving home to avoid confusion at the airport.
- Use online check-in and print boarding passes at home or use electronic versions for a faster check-in experience.
- Understand TSA regulations and organize your carry-on with the 3-1-1 rule for liquids to speed up security checks.
- Consider enrolling in TSA PreCheck or Global Entry programs for quicker screenings and less hassle during travel days.
- Plan ahead, pack smartly, dress comfortably, and arrive early to navigate through airport security easily.
Arriving at the Right Terminal

Check your airline’s terminal before you leave home. Most airports have clear signs to guide you, but it’s best to know ahead of time. Use the airport’s website or your airline app to find out where to go.
If you’re driving, look for signs as soon as you enter the airport area. Parking at the correct spot can save you a lot of time.
Once inside, check the departure boards right away. They’ll tell you if there’s been a gate change or delay. This way, you won’t waste time at the wrong place and can head straight for security screening without any last-minute rushes.
Mastering the Check-in Process

Stepping through the airport doors, you’re faced with your first strategic move: mastering the check-in process—a pivotal step that sets the tone for your entire journey. Know this; a flawless check-in experience can mean the difference between starting your trip on a high note or racing against time, drenched in stress-sweat as you sprint to your gate.
How to check-in for your flight
Checking in for your flight is easy and saves time. Here’s how to breeze through the process:
- Check in online up to 24 hours before your flight. This helps you skip long lines at the airport.
- Use your airline’s website or mobile app. Enter your booking information to find your reservation.
- Choose your seat if you haven’t already. Pick a window or aisle spot that suits you best.
- Pay for any checked bags now to avoid higher fees at the airport. It’s usually cheaper online.
- Print out your boarding pass at home, or use the option to send it to your phone.
- At self – service kiosks in the airport, print boarding passes or bag tags with a few taps.
- If checking bags, drop them off at the designated counter. Show your ID and boarding pass here.
- For international flights, have your passport ready. Agents will check it during this step.
Tips for checking a bag
Once you’ve checked in for your flight, it’s time to handle your checked baggage. Keep your travel smooth by following these bag-checking tips:
- Use a digital scale to weigh your luggage at home. This helps you avoid extra fees for heavy bags.
- Label your bags with your name and contact information inside and out. This makes it easier to find them if they get lost.
- Choose TSA – approved locks to keep your belongings secure yet accessible for inspections.
- Pack valuables like laptops, cameras, and documents in carry – on luggage. You’ll know they’re safe with you.
- Arrive early, especially if you’re traveling internationally or during peak times, to allow enough time for baggage processing.
- Keep a change of clothes and essential items in your carry-on bag in case your checked baggage gets delayed.
- Photograph what’s in your suitcase as a record of what you packed if something goes missing or is damaged.
- Know the list of prohibited items to prevent security hold-ups or unpacking at the airport.
- Confirm that your luggage meets the airline’s size and weight restrictions when checking online or at kiosks.
Navigating through Airport Security Checkpoints
Navigating through airport security checkpoints can often feel like navigating a maze, with twists and turns of rules that vary by country and airport. But fear not—with an understanding of TSA guidelines and optional programs like Precheck or Global Entry, you’ll be threading your way through with the poise of a travel guru.
Understanding TSA regulations
TSA regulations are here to keep us safe in the sky. They set rules about what you can carry onto a plane and what needs to go through the x-ray machine. You’ll need to take off your shoes, belts, and jackets before walking through metal detectors.
Laptops and liquids have their own rules – electronics must be taken out of bags, and liquids should be in containers no larger than 3.4 ounces.
For a smoother trip, get familiar with these guidelines before you pack your bags. If you know what’s allowed and prepare accordingly, airport security becomes much easier. With everything neatly packed and ready for screening, you’re all set to move on quickly towards benefits of TSA Precheck or Global Entry – next up on your airport journey!
Benefits of TSA Precheck or Global Entry
Traveling often for work as a digital nomad or remote worker? TSA PreCheck and Global Entry can save you time and stress. With TSA PreCheck, breeze through airport security without needing to remove your shoes, laptops, liquids, belts, or light jackets.
Imagine gliding past long lines and easing into the comfort of the departure lounge faster than ever before.
Global Entry takes it up a notch for international travel—no more filling out paperwork or waiting in winding customs lines after a long flight. Trusted travelers zip right through with access to self-service kiosks at select airports.
These programs don’t just offer convenience; they’re an investment in efficiency that lasts five years. After sailing through security checkpoints smoothly, you’ll find yourself ready to grab coffee or catch up on emails sooner than expected—refreshed and fully prepared to navigate to your next destination: finding your way around the airport to your gate.
Tips for a Smoother Experience through Airport Security
Gliding through airport security can be akin to a fine art, mastered with the right preparation and know-how. Let’s dive into strategies designed to streamline your passage, making it less of a hurdle and more of a swift stride toward your awaiting aircraft.
Preparing for security screening
Going through airport security smoothly sets the tone for a stress-free flight. Stay ahead of the game with these handy tips.
- Dress smartly – Wear slip – on shoes and clothes without metal parts to breeze through metal detectors.
- Pack liquids correctly – Keep all liquids in containers smaller than 3.4 ounces and stash them in a clear, quart-sized bag.
- Organize electronics – Place laptops and tablets in an easy-to-reach spot in your carry-on, so you can quickly pull them out.
- Sort your pocket items – Have keys, phones, and coins in a small bag to prevent hold – ups at security.
- Opt for TSA PreCheck or Global Entry – Signing up means less hassle: no need to remove shoes, belts, or light jackets.
- Keep documents ready – Hold onto your boarding pass and ID until after the TSA agent checks them; then secure them away fast.
- Arrive early – Rushing leads to mistakes. Give yourself ample time for screening, especially during peak hours.
What to do with liquids
Keeping track of your liquids is crucial at airport security. You’ll glide through checkpoints with less hassle by following TSA’s 3-1-1 rule for carry-on bags. Here’s how to handle liquids:
- Grab a quart – sized clear plastic bag before you pack. Only this size fits the TSA’s requirements.
- Fill it up with bottles holding three ounces or less. Make sure they fit comfortably in the bag.
- Seal the bag so it closes with no bulges. Overstuffed bags may need extra screening.
- Pull out your liquid bag when you reach security. Place it in a bin on its own for x – ray scanning.
- Don’t forget to check for any larger liquid containers. If found, they’ll be tossed out at checkpoints.
- Look into alternatives like solid toiletries or buy some items after passing security to save space.
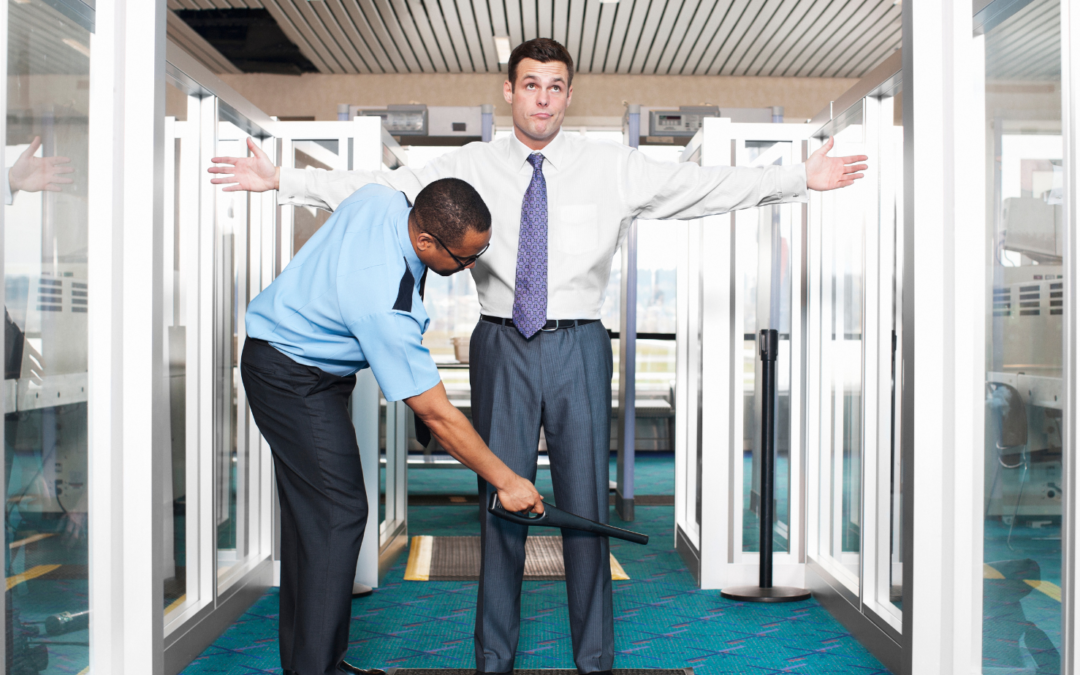
How to handle pat-down screening
After taking care of your liquids, you might face a pat-down screening. This can happen if the scanner alarms or if you opt out of advanced imaging technology. Stay calm and remember it’s a standard procedure to ensure safety.
TSA officers should explain the process before they begin. You have rights during this screening: ask for a private room if you’re not comfortable with being screened in public. They’ll also allow someone else, like a friend, to be with you.
If an officer needs to search sensitive areas of your body, they will use the back of their hands for gentler contact. Be clear about any medical conditions or devices that might affect the pat-down process—you don’t want any surprises! Speak up immediately if there’s something wrong or unclear; communication is key here.
Finally, knowing what sets off alarms—like certain metals or electronics—can help avoid unnecessary screenings in the future.
Finding Your Way around the Airport to Your Gate
Navigating the bustling airport maze to your gate might seem daunting, but with a keen eye for airport signage and a bit of savvy—hey, you’ve got this; keep reading for those insider navigation hacks that’ll have you boarding like a seasoned traveler.
How to locate your gate
Finding your way to the correct gate is crucial at the airport. Your gate number is on your boarding pass, and it’s where you’ll board your flight.
- Check your boarding pass for the gate number as soon as you get it.
- Look for airport signage that points towards gates and terminals.
- Use the airport’s departure screens to verify your gate number. Sometimes gate assignments change.
- Follow the signs for your specific airline, as each usually has a designated area or terminal.
- If lost, ask an airport staff member for help. They can guide you in the right direction.
- Pay attention to any announcements over the intercom about gate changes.
- Download your airline’s app; they often send real-time updates about gates and departure times.
- Keep an eye on the time so that you reach your gate well before boarding starts.
- Stay updated with the airline’s messages or emails which may include important information regarding your flight details.
Tips for changing flights
Once you’ve located your initial gate, it’s key to know how to switch flights efficiently. Digital nomads and remote workers often have complex travel schedules, so mastering the art of changing flights can save time and stress. Here are some expert tips:
- Check the airport monitors as soon as you land. Gate numbers change, and the latest info is on these screens.
- Use your airline’s app for real-time updates. They often send notifications about gate changes or delays.
- Head straight to customer service if you’re close to missing a connection. The staff can help rebook or direct you quickly.
- Look at your boarding pass for “Minimum Connection Time” (MCT). This is the shortest layover allowed to catch your next flight.
- Keep an eye on the time. Be aware of how much time you have before your connecting flight boards.
- Pack light with only carry – ons if possible. Waiting for checked luggage could slow you down when changing flights.
- Join airline loyalty programs for earlier boarding and better support during tight connections.
- Consider signing up for TSA Precheck or Global Entry to spend less time in security lines during tight turnarounds.
Retrieving Your Checked Luggage
As soon as you land, head straight to the baggage claim area. Look for the monitors displaying your flight number; they’ll tell you which carousel will have your bags. It’s a good idea to mark your luggage with something unique—a bright ribbon or sticker can help.
This makes it easier to spot on the conveyor belt among all the other bags that look alike.
If your bag doesn’t show up, stay calm and go to the airline’s service desk nearby. Give them your baggage claim ticket—the one you got when checking in your luggage—and explain what happened.
They can track down where it is and tell you how they will get it back to you. Most times, airlines find lost bags within 24 hours and deliver them directly to where you’re staying, sometimes even offering compensation for delayed bags!
Making the Most of Your Airport Experience
Maximizing your time at the airport can transform a routine wait into an opportunity for leisure or productivity. From discovering quiet corners for focused work to indulging in the amenities of exclusive airport lounges, savvy travelers know how to turn a layover into an advantage.
Practical tips for first-time solo flyers
Pack light to breeze through checkpoints and avoid waiting for checked luggage. Have your documents handy — passport, boarding pass, and ID should be within easy reach. Dress simply with slip-on shoes and minimal jewelry to save time at security.
Keep a digital copy of important docs on your phone in case anything gets lost.
Charge all your devices the night before. Download airport maps, airline apps, and entertainment to keep calm during waits or delays. Find a comfortable spot near your gate once you’ve passed security — good for people-watching and staying alert for gate changes.
Reach out kindly to fellow travelers or staff if you need help; most are willing to assist a solo flyer navigating new spaces!
How to make the most of a long layover
After learning the practical tips for flying solo, a long layover might come next. It’s not just waiting; it can be an adventure. Bigger airports sometimes have city tours starting right at the terminal.
If you’re in such an airport, grab this chance to see new sights without leaving the airport area.
With a long stop, there’s no need to sit by the gate bored. Hit the gym if one is available, or find a comfy spot in an airline lounge. Research shows planning ahead lets travelers enjoy their time better—book lounges or city tours before landing to turn that layover into part of your journey!
Conclusion
Fly through airport security with ease using these pro tips. Keep your paperwork ready and double-check your bags for no-nos. Slip off those shoes quickly, avoid bulky jewelry, and consider TSA PreCheck for speedier screening.
Ask airport staff for help if you’re unsure where to go. Mastering these steps will make any trip smoother, leaving more time to enjoy the journey!